Building Chatbots for GitHub
I am definitely a human beep boop

Will Carhart
Will Carhart

Pardon the Interruption
This blog post was written under a previous major version of willcarh.art (e.g. v1.x vs. v2.x). This may seem trivial, but because some of my blog posts reference the website's code, links and code snippets may no longer be valid. Thank you for understanding and please enjoy the post!
News Flash!
The content and lessons learned from this blog post are a product of my most recent project, Soliloquy, which I made to promote what I call software-as-a-hobby. If you haven't checked it out yet, I highly recommend it!
Let's get chatty!
Here's an interesting use case: Suppose you manage a large open source software project. When a new contributor opens a Pull Request, you'd like some tests to run. Pretty standard, right?
However, perhaps you'd also like to inspect the results of these tests and leave the new contributor a personalized comment with why they passed or failed. How would we automate this? Well, first we'd have to somehow automate the testing process, plug that into our repository via CI/CD, and then pipe the results of our testing to some automated process that could then comment on the Pull Request.
As it turns out, this is very possible! There are many ways to accomplish it; let's discuss one possibility. For our testing, we'll just need Python. For our CI/CD, we'll use Travis CI. Finally, for our automated commenting process, we'll make a simple bot using the GitHub API. I promise it sounds more complex than it actually is! 😊
Let's dive in!
Utilizing the GitHub API
Let's start with the GitHub API. The GitHub API allows us to automate essentially any functionality of GitHub via HTTP requests. For example, you can make a new remote repository like so (in Bash):
curl -X POST -u $USER https://api.github.com/user/repos -d "{ \
    \"name\": \"$REPONAME\", \
    \"private\": false, \
    \"has_issues\": true, \
    \"has_downloads\": true, \
    \"has_wiki\": false \
}"
Pretty cool, right? Here is a Bash function I wrote to create a GitHub remote on the fly, so you don't have to navigate to github.com when you make a new local repository.
Now, let's consider how we want to use the GitHub API. Rather than dive into the documentation, let's first consider what we want to do as a human. When a new contributor opens a Pull Request, we'd like to eventually leave a comment on that Pull Request about its content. So, we need to automate, via the GitHub API, the ability to leave comments on Pull Requests.
Let's take a look at the GitHub API Documentation, as this will tell us how to utilize the API for our needs. Intuitively, you might look for the solution in the Pull Request section of the documentation. This is a little bit misleading, because while we are leaving a comment on a Pull Request in reality, the GitHub API classifies Pull Request comments as the same as Issue comments.
Knowing this, let's take a look at the Issue section of the documentation. We can see that we can comment on an open Issue or Pull Request via its index number, like so (in Bash):
curl -X POST -u $USER https://api.github.com/repos/$USER/$REPONAME/issues/$PRNUMBER/comments -d "{ \
    \"body\": \"Hello, this is a new comment!\" \
}"
Bash is kinda hard to read, what would this look like in Python?
Heads Up!
From here on out, you'll need to use a personal access token to use the Github API. Use this helpful tutorial to generate your own token (all you need is a GitHub account). For our purposes, we'll need to select the repo:status, repo_deployment, and public_repo scopes found under the repo category.
A good rule is to not grant your application more privileges than necessary! Often a safe way of storing secrets, like API keys, is to set them as environment variables.
Here's what the above POST request would look like in Python, via the requests library:
import os
import requests

GITHUB_TOKEN = os.environ.get('GITHUB_TOKEN')
headers = { 'Authorization': f'token {GITHUB_TOKEN}' }
content = '{"body":"Hello, this is a new comment!"}'
response = requests.post(
    f'https://api.github.com/repos/{user}/{repo}/issues/{pr_number}/comments',
    headers=headers,
    data=content.encode('utf-8')
)
Automation is under way! beep boop 🤖
Integrating with Travis CI
Now that we can leave automated Pull Request comments, let's move onto the next task: How do we get our Python code from above to run every time there's a new Pull Request?
Continuous Integration and Deployment, or CI/CD, are tools that allow us to automatically run code and tests, as well as deploy software, on a regular basis, such as when code is committed or a new Pull Request is opened. There are many great CI/CD tools. We will be using Travis CI because it's free and "fairly" easy to set up.
Heads Up!
I'm not going to go into depth on setting up Travis CI, so please refer to this helpful tutorial if you haven't done that before.
Suppose, for now, we have a Python script for leaving automated comments on Pull Requests in a script called comment.py. Let's use the following .travis.yml file so our script gets run every time a Pull Request is opened.
language: python
python:
  - 3.7
install:
  - pip install -r requirements.txt
script:
  - if [[ $TRAVIS_EVENT_TYPE == "pull_request" && $TRAVIS_PULL_REQUEST_BRANCH != "master" ]] ; then python comment.py ; fi
Breaking this down, the important part is the script section, which uses a Bash statement to check the Pull Request branch. This statement says that if the current commit is via an opened Pull Request, we should run our automated commenting Python script.
Using Python to glue everything together
We're almost there! How do we tie it all together?
Now, you'll have to decide how your tests will actually work, and what you're testing for. For example, you could test for the existence of a specific file, like so:
import os
def test_file_existence():
    return os.path.isfile('myfile.txt')
You could also use a testing framework, like the builtin unittest Python module. There are endless possibilities!
For now, I'll leave the content of the tests up to you, and make a generic script instead. Let's write some Python code that will run some tests and leave a GitHub comment based on the tests' results. The script below will rely on some Travis CI environment variables, so that the script can be automated when a Pull Request is opened.
import os
import requests

def test_something():
    """Run some automated tests"""
    test_passed = True
    # content of your test goes here, update 'test_passed' accordingly

    if test_passed:
        return 0, "The test passed!"
    else:
        return 1, "Uh oh, the test failed!"

def add_github_comment(result, message):
    """
    Add a comment to a Pull Request in GitHub
        :result: (int) exit code of tests, 0 is pass, 1 is fail
        :message: (str) the content of the Pull Request comment
    """
    travis_pull_request = os.environ.get('TRAVIS_PULL_REQUEST')
    user = "YOUR GITHUB USERNAME"
    repo = "YOUR GITHUB REPOSITORY NAME"

    GITHUB_TOKEN = os.environ.get('GITHUB_TOKEN')
    headers = { 'Authorization': f'token {GITHUB_TOKEN}' }
    content = f'{{"body":"{message}"}}'
    response = requests.post(
        f'https://api.github.com/repos/{user}/{repo}/issues/{travis_pull_request}/comments',
        headers=headers,
        data=content.encode('utf-8')
    )

def main():
    result, message = test_something()
    add_github_comment(result, message)

if __name__ == '__main__':
    main()
There ya go! If you have both .travis.yml and the above code saved as comment.py in your repository, you'll get automated comments on Pull Requests! You can also check out the code here.
Heads Up!
In order for the above code to work, you'll have to add GITHUB_TOKEN as a secure environment variable to your Travis environment. There are a few ways to do this, as outlined in Travis' documentation.
Getting extra creative
The above code a great starting point! What else could we accomplish with this?
- We could build more complex Pull Request comments by using GitHub's markdown language to leave stylized content.
- We could create a separate GitHub account for our commenting bot.
- We could deploy our application, if our tests pass.
I did all of the above in my latest personal project, Soliloquy (www.soliloquy.dev), which uses CI to leave complex Pull Request comments via a GitHub bot account known as the Friendly Committer. If you'd like to see how this works, feel free to check out its code here. Here's what this looks like in practice:
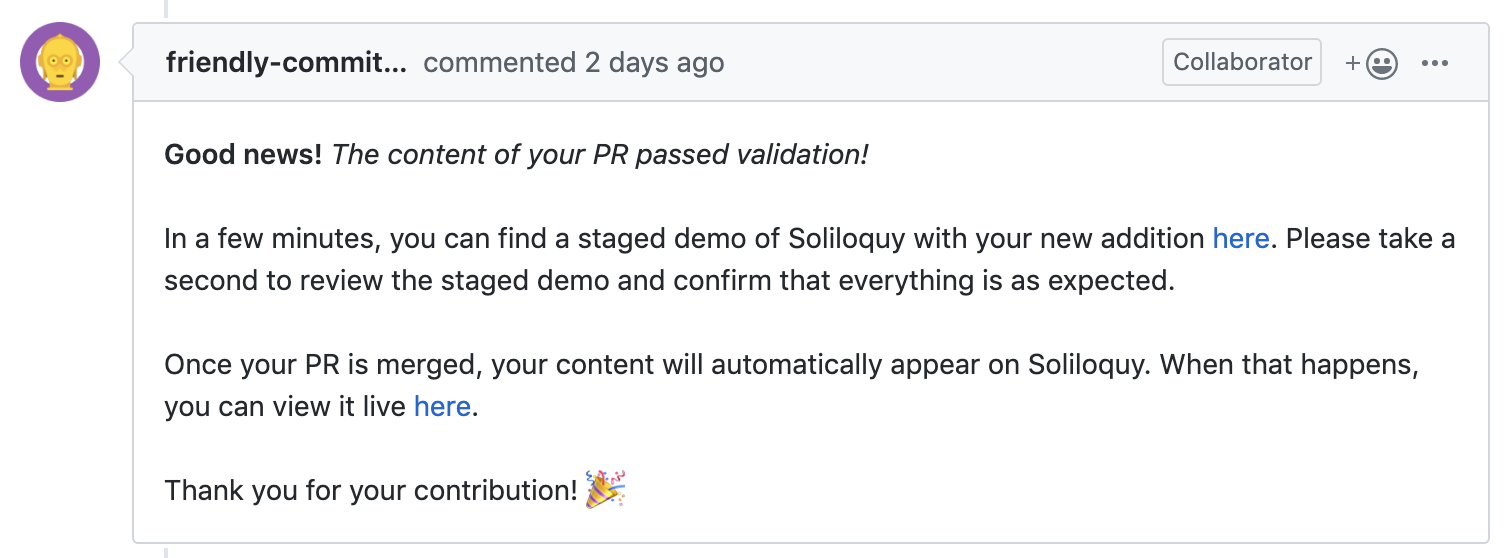
Friendly Committer commenting on a PR on GitHub
Closing Notes
And there you have it! This blog post barely scratches the surface of what automation is possible via Travis CI and the GitHub API. What's even more exciting is the introduction of CI/CD in GitHub Actions, which was announced in August 2019. Who knows, maybe this tutorial will be deprecated within the near future due to GitHub Actions!
Hey there!
If you've made a cool software project using some of the lessons from this blog post, I'd love for you to submit it to Soliloquy!
🦉
Artwork by Painterstock